Want to start your very own food blog but don’t know how? Believe me, I know how intimidating it can be, especially if you’re not tech savvy. Luckily, you don’t have to be. After spending hours upon hours researching how to start my own food blog back in 2014, I realize how much time I could have saved had I found a resource with everything I needed to know in one place. Now a few years later, I want to share with you what I learned. Below is an easy step-by-step guide on how to get your food blog up and running in no time.

Step 1: Choose a blogging platform
One of the most popular platforms for starting a blog is WordPress. This is what I use and I highly recommend it. WordPress offers two different options:
- WordPress.com – A hosted free version that’s great if you’re not really looking to take your blog in a more professional direction. You don’t have to worry about of any of the techie, back end stuff but you also have less control over the design and aren’t allowed to monetize your site. Your domain will look something like this: myfoodblog.wordpress.com.
- WordPress.org (what I recommend) – A self-hosted version that gives you a ton more freedom in terms of site design and features that you can add. You’re also able to monetize your site as you wish, which is huge if you’re looking to make blogging more than just a personal hobby. The platform itself is free to use but you will need to purchase your own domain and hosting (which I teach you how to do below). Because you’re choosing your own domain, it will look something like this: myfoodblog.com.
Step 2: Choose a domain name and hosting service
Choosing a domain for your blog is an important (and fun!) step. It’s really the first impression of your blog that readers will get and will be typing into their URL bar or a search engine to get to your site (for example, mine is fromcatstocooking.com). I recommend doing some brainstorming and writing down as many ideas as you can think of before choosing your domain. It can also be helpful to run some ideas by a few friends or loved ones to get their reaction.
A good domain name is easy to remember, on the shorter side and usually ends in .com. Here are a few articles on choosing a great domain name to help you get the juices flowing.
- How to Choose a Domain Name (Amy Lynn Andrews)
- 4 Things to Consider When Choosing Your Domain Name (ProBlogger)
- How to Choose the Right Domain Name (Moz)
Once you’ve got a list of a few domain names that you really like, it’s time to make sure they’re available. I highly recommend using Bluehost to pick your domain name because they’re super easy to work with and have great customer service. Also, your domain name is FREE when you purchase web hosting through them.
So what exactly is web hosting? Hosting is like renting space on the internet so your blog has a place to live. It’s really as simple as that. There are many hosting companies out there but Bluehost is the one I suggest you use. It’s inexpensive and they really have everything you need in one place.
Here’s how to get started.
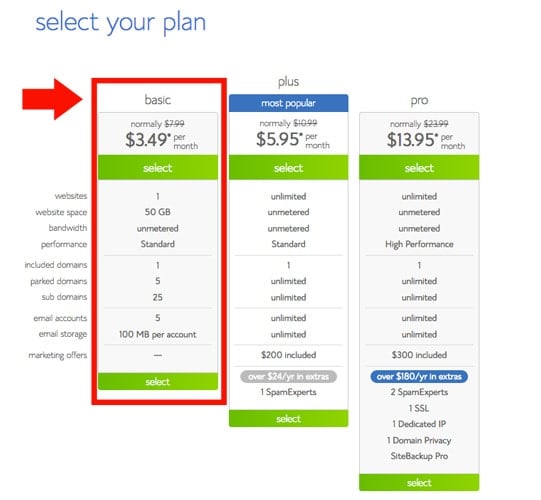
Go to Bluehost and select the Basic plan. It’s the most inexpensive option and is perfect if you’re just starting your food blogging journey.
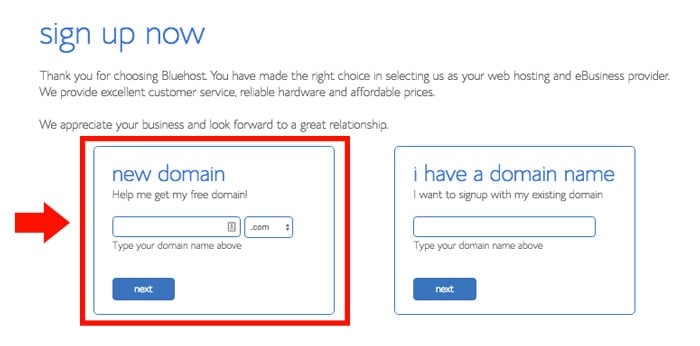
You’ll then be directed to a sign up screen. This is where you can check the availability of the domain names you’ve brainstormed.
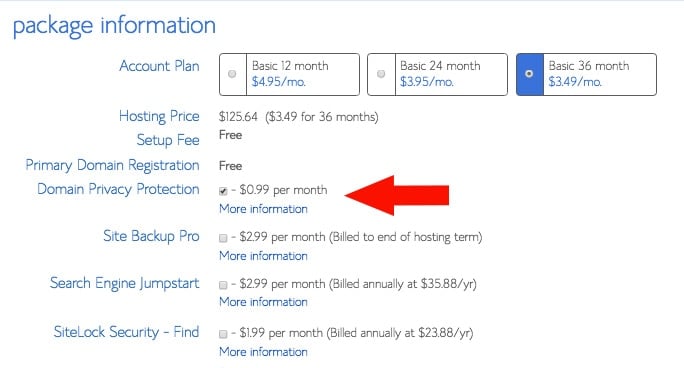
Once you’ve chosen a domain name that is available, you’re ready to sign up for one of the hosting plans. Whether you choose the 12, 24 or 36 month plan (I recommend either the 24 or 36 because it saves you a significant amount of money), make sure to check the Domain Privacy Protection box. Checking the box protects you from having your personal information such as your address and phone number displayed publicly. That’s no bueno.
Step 3: Install WordPress
Now that you’ve got a domain name and a hosting service, it’s time to install WordPress. Simply login to your Bluehost account and find the Install WordPress button.
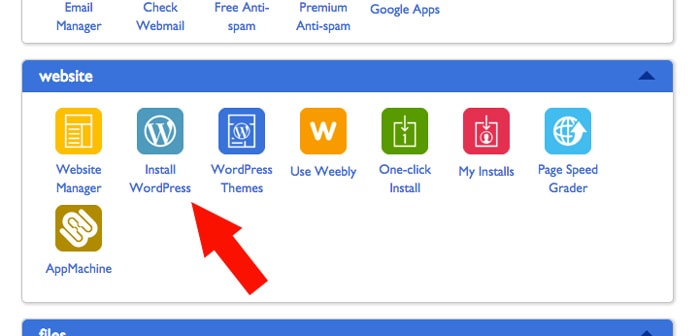
Click the option to install WordPress yourself.
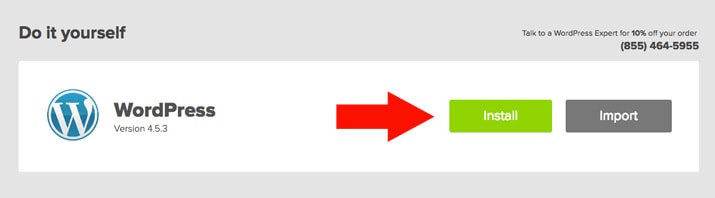
Continue following the prompts to install WordPress. Once installed, you’ll want to click on View Credentials and then write down your Admin URL, Username and Password.
Go to your Admin URL and log in using the Username and Password you just wrote down.
WOO HOO! Congratulations! You have officially logged into your blog!
Step 4: Install a WordPress theme
Now comes the super fun part – it’s time to make your blog look beautiful! To do that, you need to install a theme. WordPress has a lot of free themes you can use. You can find them here. However, if you’re looking for something a little more unique and professional, you’ll probably want to purchase a premium theme.
Here are some I recommend.
- Divine Theme – This is the theme I’m currently using and I absolutely love it! It was created by Lauren at Restored 316 Designs where she also sells other beautiful themes that I highly recommend.
- The Genesis Framework – The theme I’m currently using is built on the Genesis Framework, one of the most popular and highly regarded WordPress theme frameworks. I like to think of Genesis as the foundation of my blog. Another way to think of it is this: if your blog was a car, WordPress would be the engine, Genesis would be the frame/body and your theme would be the paint job.
- StudioPress Themes – This is the same company that created the Genesis Framework. They have tons of beautiful themes, including the popular Foodie Pro Theme.
- Elegant Themes – This company has a large collection of beautiful themes that many bloggers love. They’re also slightly cheaper than many other premium options so it’s a good middle ground.
Next step? Start creating content! Be sure to check out these other resources for food bloggers to help you on your food blogging journey.
This page contains affiliate links. If you make a purchase after clicking one of my links, I may receive a small commission. The price of the item stays the same and any money I make goes to supporting this blog. I only endorse products and services that I fully believe in. Thanks for your support!